
 Monday, March 20, 2006
Feet (frosty foot prints) IF
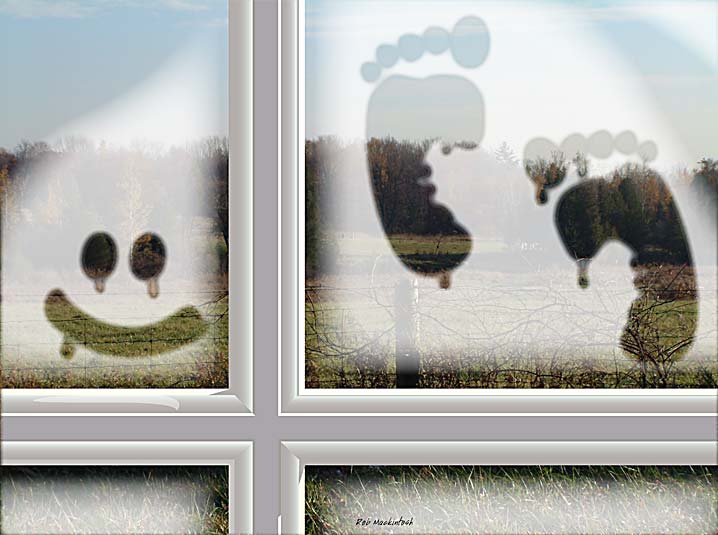
Who hasn't made foot prints using the side of their fist on glass and then, finger touches for the toes? (This method sometimes known as a baby's footprint works on steamy glass or as I have illustrated here, windows covered in a morning frost) -- and then go on to doodle other "window Picasso's" like the ever popular smiley face.
On this IF assignment, which by the way, is done completely in Illustrator CS, (the photo image is a jpg imported into illustrator on the base layer) See how-to below on the various steps & stages involved. Layer 1 complete, more later, so keep checking back frequently
Note: If you like my illustrator how-to's, and would like them to continue, please let me know.
HOW-TO:

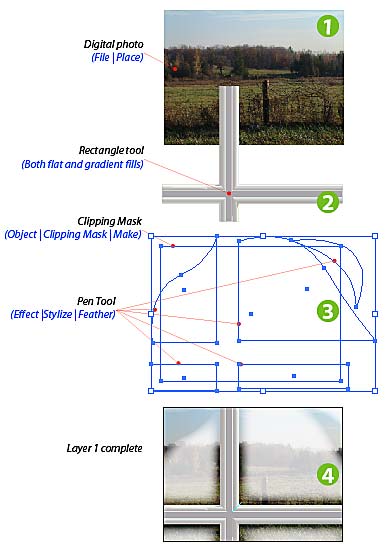
Three layers are used in this drawing, so starting with layer 1...
Step 1...
I placed one of my digital camera shots, highlited and sized it to fit my page dimension (scale tool-click in (any) corner and with shift down, drag diagonally)
Step 2...
Selecting the rectangle tool from the tools pallette, I created one of the two main cross bars of the window, and then copy-rotated it 90° with the rotate tool --tools pallette (I clicked on copy within the dialogue box) . I then moved these rectangles into position over the photo. I colored these with a flat fill, and added more smaller rectangles to form the full wood shape of the cross bar -- these were painted with linear gradient fills to appear 3D.
There are two ways to rotate an object:
1) choose rotate tool, highlite the object to be rotated, click on the object, and drag-rotate with the mouse (where you click the rotate tool is like inserting a push-pin which becomes the point of rotation)
2) choose rotate tool, option click the object to be rotated and a dialogue box opens for exact degree number rotation (where you option click the rotate tool is like inserting a push-pin which becomes the point of rotation) PC USERS NOTE: alt click = option click
Step 3...
Selecting the pen tool,I drew the frost shapes I wanted in the four window panes. They were then painted white, but too solid and harsh for frost. To adjust, I clicked open the transparency tool pallette and selected the Screen function and a transparency value of 77%. To soften the edges, I added a feather value of 0.1 in. (this worked for the size of my artwork, you may have to adjust to suit for your size) To get to the feather adjust area--Effect | Stylize | Feather.
Step 4...
This completes layer one... next: Step 5 begining at layer 2.
CLICK TO ENLARGE
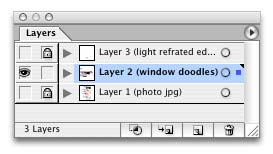
Working on layer 2


CLICK TO ENLARGE
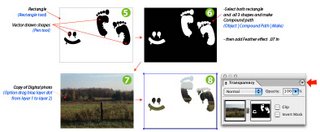
Step 5...
Lock layer 1 and create a new layer (2). Get rectangle tool and drag a rectangle the size of the imported photo. Click the pen tool and draw one footprint shape and one smiley face shape. Duplicate the full footprint shape by selecting it and then with the reflect tool (depending on which tool was last used, it is in with the rotation tool --just click and hold to reveal) Option-click the reflect tool beside the highlighted footprint and click vertical and copy to make the second footprint. While this new footprint is still highlighted, switch to the rotate tool and click and rotate the footprint slightly to make it appear to be a natural step compared to the original footprint.
Lock layer 1 and create a new layer (2). Get rectangle tool and drag a rectangle the size of the imported photo. Click the pen tool and draw one footprint shape and one smiley face shape. Duplicate the full footprint shape by selecting it and then with the reflect tool (depending on which tool was last used, it is in with the rotation tool --just click and hold to reveal) Option-click the reflect tool beside the highlighted footprint and click vertical and copy to make the second footprint. While this new footprint is still highlighted, switch to the rotate tool and click and rotate the footprint slightly to make it appear to be a natural step compared to the original footprint.
Step 6...
With the drawing portion done, select the rectangle and the three vector shapes (click and drag, lasso style with the pointer tool). When selected, make it a compound path (Object | Compound Path | Make Compound Path). This step auto groups these elements into a new unit that has a visual quality on the letter "O" in a font. Any shapes in the middle (actually on top of) of the biggest outside shape (rectangle) become transparent.
After making the compound path, we need a bit more feathering add a value of .07. (see above in first steps if necessary)
Step 7...
Click anywhere off the compound shape to de-select it. Now turn on the first layer and select just the photo image. Go over to the layers menu and find the blue highlight cube (yours may not be blue, but will be the color of your layer 1). With the option/alt key held down drag the cube up to layer 2 and let go. We've just copied the photo to a new layer, and doing it this way ensures an exact positioning of it beneath our newly made compound shape, just where we want it.
THIS NEXT STEP OPACITY MASKING IS SOMETHING VERY USEFUL TO KNOW ABOUT
Step 8...
Go back and click the lock on layer 1. Lasso select, choose under the File menu Select All for layer 2. The photo should be below the compound drawing, and you should see the photo showing through the shapes. Just what we want, but not the black background. To make the black background mask properly, Go to the Transparency Tool and click it open. Go to the drop-down switch (See red arrow) and click down to Make Opacity Mask. Now the black background of the original rectangle is transparent and the footprints and smiley face have the photo areas showing through. If you weren't aware of Opacity Masking before, I bet you can now think of a few other things to use it for! Turn on layer 1 view if it is not showing and you see the almost completed rendering.
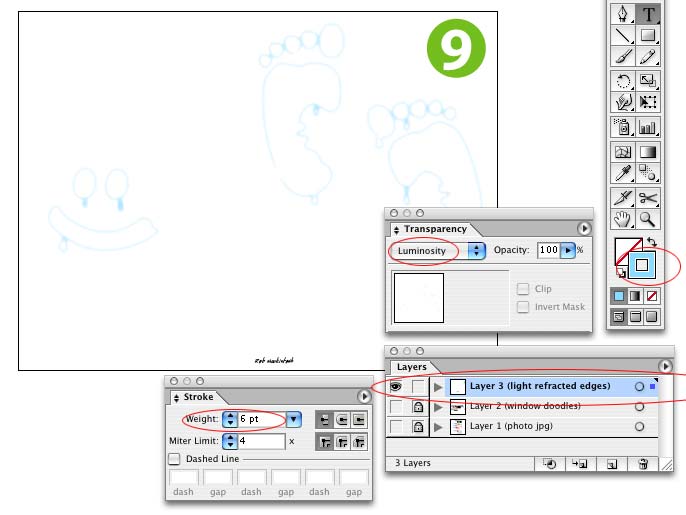
Layer 3 Step 9 (one final trick).

For this last step, I created a new layer 3, and drag copied the vector drawing elements from layer 2 to it. (Actually I copied the whole compound path up and then released the path to get back to my original drawings). Then I added a 5 pt bright light blue line weight, no fill, —selected the luminosity function from the transparency menu.
This is more of a fussy step, because it is hardly noticable, but I like to make my renderings as true as I can. The slight amout of blueish halo this created gave the drawing more realism.
With the drawing portion done, select the rectangle and the three vector shapes (click and drag, lasso style with the pointer tool). When selected, make it a compound path (Object | Compound Path | Make Compound Path). This step auto groups these elements into a new unit that has a visual quality on the letter "O" in a font. Any shapes in the middle (actually on top of) of the biggest outside shape (rectangle) become transparent.
After making the compound path, we need a bit more feathering add a value of .07. (see above in first steps if necessary)
Step 7...
Click anywhere off the compound shape to de-select it. Now turn on the first layer and select just the photo image. Go over to the layers menu and find the blue highlight cube (yours may not be blue, but will be the color of your layer 1). With the option/alt key held down drag the cube up to layer 2 and let go. We've just copied the photo to a new layer, and doing it this way ensures an exact positioning of it beneath our newly made compound shape, just where we want it.
THIS NEXT STEP OPACITY MASKING IS SOMETHING VERY USEFUL TO KNOW ABOUT
Step 8...
Go back and click the lock on layer 1. Lasso select, choose under the File menu Select All for layer 2. The photo should be below the compound drawing, and you should see the photo showing through the shapes. Just what we want, but not the black background. To make the black background mask properly, Go to the Transparency Tool and click it open. Go to the drop-down switch (See red arrow) and click down to Make Opacity Mask. Now the black background of the original rectangle is transparent and the footprints and smiley face have the photo areas showing through. If you weren't aware of Opacity Masking before, I bet you can now think of a few other things to use it for! Turn on layer 1 view if it is not showing and you see the almost completed rendering.
Layer 3 Step 9 (one final trick).
For this last step, I created a new layer 3, and drag copied the vector drawing elements from layer 2 to it. (Actually I copied the whole compound path up and then released the path to get back to my original drawings). Then I added a 5 pt bright light blue line weight, no fill, —selected the luminosity function from the transparency menu.
This is more of a fussy step, because it is hardly noticable, but I like to make my renderings as true as I can. The slight amout of blueish halo this created gave the drawing more realism.
posted by Rob Mackintosh at 8:10 PM
![]()
![]()

11 Comments:
this is very clever, such a subtle way to illustrate the topic
Ha!
Lovin' the cold feet.
(Uh-oh, feel a pun coming on...turn away now...)
This is a very sole-full illo, makes me remember Jack Frost nipping at my toes on cold wet snowy days.
WOW. That looks awesome. I'll have to check back for the how to.
love
This is cool! I never thought of having my footprint in a steamy glass! Great idea!
Very cute; "a baby lives here"
Fantastic idea here! You definitely have dominion over Illustrator....very inspiring! Thanks for visiting my "feet" - glad you liked!
great take on this topic… and it's nice to see the tutorial…
you are the spirit of the net, my friend, all what it was intended to be! keep it going.
great illustration! yes, no shortage of steamed up glass in UK, mainly on bus windows i remember.
wow.Very good!
That's very COOOL!
Beautiful illustration...and I love the how-to as well! My first visit here, but I will come back often--your blog is wonderful.
Post a Comment
<< Home